 |
|||||
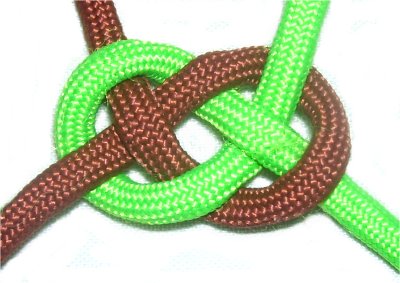
| Description: The Sailors Knot
is considered a variation of the Josephine
knot, but you use two separate
cords. There are also two loops, rather
than three. This decorative knot is a great technique to use when making jewelry projects, particularly with leather, which helps hold the knot's shape. You can also use it to link 2 cords together, or as a mounting knot. Below the main instructions I have shown you two other ways to use this knot; in a sennit (chain), and with an alternating design. |
|||||
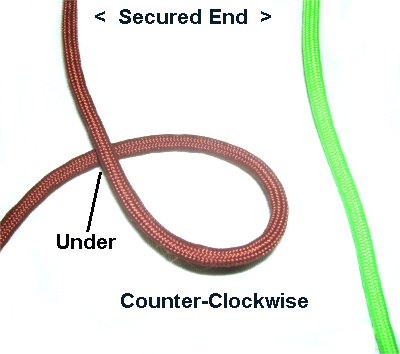
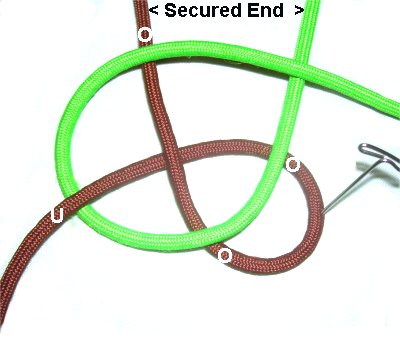
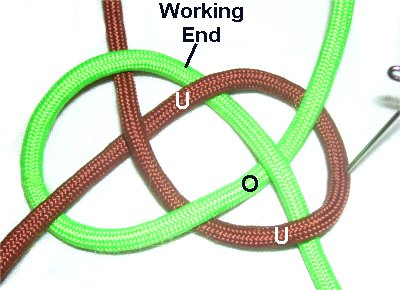
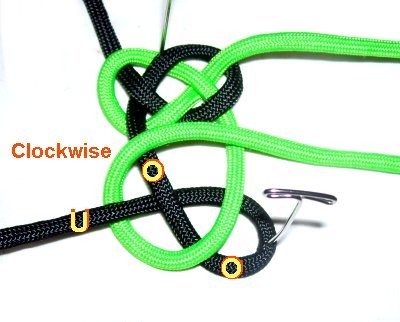
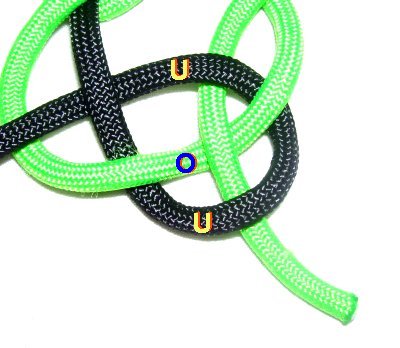
| Step 1: You need 2 cords to practice, each at least 36 inches long. Using two colors really helps while you are learning. | |||||
|
|||||
|
|||||
|
|||||
|
|||||
 |
|||||
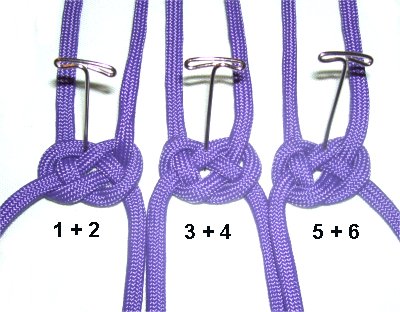
Creating a Sennit |
|||||
|
|||||
|
|||||
|
|||||
|
|||||
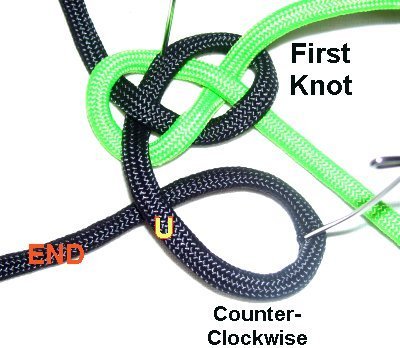
| Step 4: Repeat steps 1 - 3 to make the remaining knots in the sennit. | |||||
|
|||||
Alternating Pattern |
|||||
 |
|||||
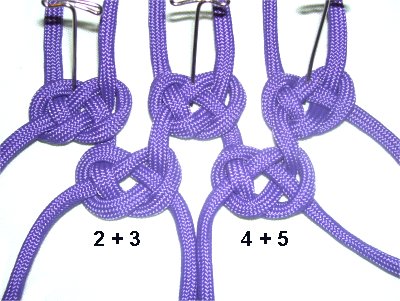
| The other way the
Sailors Knot can be used is in an alternating
pattern, similar to Alternating Square
Knots. Start by securing 3 folded cords to your board, so you have 6 ends to work with. |
|||||
|
|||||
|
|||||
| Design Tip: In the images shown, I left space between the rows to help you see the details. You can either mimic this arrangement when you practice, or place the rows close together. | |||||
|
|||||
| ماكرامي، مكرامي ،تعلم ، مكرامي ، خياطة ،أشغال يدوية ،فن مكرامي،صندوق ابيض،عروس ،زوج ، حمل ،طبخ ،حلويات ،أشغال يدوية ، للعرائس،قنادر ،خياطة ، ،شرح ،mkrami2014ماكرامي، مكرامي ،تعلم ، مكرامي ، خياطة ،أشغال يدوية ،فن مكرامي ،شرح ،mkrami2014 عمل علبة للاكسسوارات ,طريقة عمل علبه للاكسسوارات انيقه ,طريقة عمل قفص للاكسسوارات جميل وانيق , عمل علبة اكسسوارات غير مكلفه ,عمل قفص للاكسسوارات بالصور,طريقة عمل علبة اكسسوارات بالصور ,شرح طريقة عمل علبه للاكسسوارات بالصور ,اسهل طريقه لعمل علبة اكسسوارات ,طريقة عمل علب الاكسسوارات ,طريقه عمل قفص للاكسسوارات بالصور ,اعمال فنية.اشغال يدوية بالعجائن.عجينة الملح والسيراميك.اعمال فنية.اعمال بالورق،طريقه عمل خداديه كلها ورد من نفس القماش , طريقه عمل خداديه كلها ورد من نفس القماش , طريقه عمل خداديه كلها ورد من نفس القماش , طريقه عمل خداديه كلها ورد من نفس القماش , طريقه عمل خداديه كلها ورد من نفس القماش اضغط هنا وأنشر الموضوع على صفحتك، تسريح الشعر ، عروسة ، رمضان 2014، مكرامي 2014 ، lmvhld 2014Klhmvhld 2014Kماكرامي، المركامياعمال فنية.اشغال يدوية بالعجائن.عجينة الملح والسيراميك.اعمال فنية.اعمال بالورق،طريقه عمل خداديه كلها ورد من نفس القماش , طريقه عمل خداديه كلها ورد من نفس القماش , طريقه عمل خداديه كلها ورد من نفس القماش , طريقه عمل خداديه كلها ورد من نفس القماش , طريقه عمل خداديه كلها ورد من نفس القماش اضغط هنا وأنشر الموضوع على صفحتك، تسريح الشعر ، عروسة ، رمضان 2014، مكرامي 2014 ، lmvhld 2014Klhmvhld 2014Kماكرامي، المركامي ،مكرامي, الخامسة, كرية, عقدة, غرز | |||||
|
 |
||||
|
Triangle
Knot
Triquetra Symbol |
||||
|
Description: The Celtic
Triangle Knot is a historical knot based on the
symbol called the Triquetra,
which is found in many ancient European art
designs. It represents a variety of concepts, such as body, mind and spirit,as well as the elements -- earth, air and water. This decorative knot is sometimes called the Trinity Knot, one of the earliest designs found in art related to Christianity. Leather and Satin are good choices if you are using this Celtic knot for jewelry, since you need material that holds it shape. To see a Macrame project where this knot is featured, see the Triangle Earrings. When using Leather or Satin cord, make sure you use the Cross Pin Technique to secure the loops. |
||||
 |
Step 1: Cut one cord, at least
18 inches long. Mentally label the ends
right and left. Make the first loop by passing the left end of the cord over the right to form the crossing point. Secure the crossed area. |
|||
 |
Step 2: Make a counter-clockwise
loop with the left
end, which is now on the right. Make a clockwise loop with the right end, passing the end under to form the crossing point. Bring it over the left end before moving on to the next step. |
|||
 |
Step 3: Pass the right end through
Loop
2, entering it from
below (under - over). |
|||
 |
Step 4: Pass the right
end under Loop
1, as you bring it towards the left
upper area of the knot. |
|||
 |
Step 5: Pass the left end through Loop 3, entering it from the top (over - under). | |||
 |
Step 6: Weave the left end through the three segments in Loop 1, over - under - over. | |||
 |
Tighten the Celtic
Triangle Knot gradually. The bottom loops should
be small and the top one larger. I left the knot loose so you could see the design, but you can tighten it to any size. |
|||
| |
||||
صفحتنا على الفيس بوك
facebook
ماكرامي،
مكرامي ،تعلم ، مكرامي ، خياطة ،أشغال يدوية ،فن مكرامي،صندوق ابيض،عروس
،زوج ، حمل ،طبخ ،حلويات ،أشغال يدوية ، للعرائس،قنادر ،خياطة ، ،شرح
،mkrami2014ماكرامي، مكرامي ،تعلم ، مكرامي ، خياطة ،أشغال يدوية ،فن مكرامي ،شرح ،mkrami2014
عمل علبة للاكسسوارات ,طريقة عمل علبه للاكسسوارات انيقه ,طريقة عمل قفص
للاكسسوارات جميل وانيق , عمل علبة اكسسوارات غير مكلفه ,عمل قفص
للاكسسوارات بالصور,طريقة عمل علبة اكسسوارات بالصور ,شرح طريقة عمل علبه
للاكسسوارات بالصور ,اسهل طريقه لعمل علبة اكسسوارات ,طريقة عمل علب
الاكسسوارات ,طريقه عمل قفص للاكسسوارات بالصور ,اعمال فنية.اشغال يدوية
بالعجائن.عجينة الملح والسيراميك.اعمال فنية.اعمال بالورق،طريقه عمل خداديه
كلها ورد من نفس القماش , طريقه عمل خداديه كلها ورد من نفس القماش ,
طريقه عمل خداديه كلها ورد من نفس القماش , طريقه عمل خداديه كلها ورد من
نفس القماش , طريقه عمل خداديه كلها ورد من نفس القماش اضغط هنا وأنشر
الموضوع على صفحتك، تسريح الشعر ، عروسة ، رمضان 2014، مكرامي 2014 ،
lmvhld 2014Klhmvhld 2014Kماكرامي، المركامياعمال فنية.اشغال يدوية
بالعجائن.عجينة الملح والسيراميك.اعمال فنية.اعمال بالورق،طريقه عمل خداديه
كلها ورد من نفس القماش , طريقه عمل خداديه كلها ورد من نفس القماش ,
طريقه عمل خداديه كلها ورد من نفس القماش , طريقه عمل خداديه كلها ورد من
نفس القماش , طريقه عمل خداديه كلها ورد من نفس القماش اضغط هنا وأنشر
الموضوع على صفحتك، تسريح الشعر ، عروسة ، رمضان 2014، مكرامي 2014 ،
lmvhld 2014Klhmvhld 2014Kماكرامي، المركامي
|
||||
 |
||||
| Celtic Button Sliding Celtic
Button |
||||
|
Description: The Celtic Button
Knot is a historic decorative knot that is very
well known. It's easy to tie, but tightening
it is the real challenge. Be sure you have no distractions when you practice. I also recommend you use a project board and pins. Button Knots can be used for decorations and jewelry. They can also be used as finishing knots to hide the ends of cords. The Sliding Celtic Button is also described below. It's tied around a holding cord, which means it can be positioned where you need it. To view a Macrame project featuring this knot, see the Celtic Button Necklace. |
||||
 |
Step 1: You need one 36-inch
cord to practice. Secure the left
end to your working surface with pins
or tape. Make a counter-clockwise loop, passing the working end over the secured end, as you bring it towards the right. |
|||
 |
Step 2: Make a second counter-clockwise
loop with the working end. Position it so it
rests on top
of the first loop, and slightly towards the
right. There should be three obvious spaces. Identify the space in the center, which is marked with an X in the image. |
|||
 |
Step 3: Bring the working end
around again to make a third loop, moving counter-clockwise. Weave the end through the first two loops, passing over - under - over - under the four segments. |
|||
 |
Step 4: Create Loop 4 by
directing the working end over
the segment of loop 3, on the right. Pass
it under the next two segments. The end should come out through the space. Make sure the end passes over the segment of loop 4 at the bottom of the knot. |
|||
 |
Step 5: Start with loop
2, to tighten loop 1.
Tighten
loop 3, and then 4. Each loop you pull will tighten the one before it. The final step is to pull on the end, which tightens loop 4. |
|||
|
|
||||
 |
||||
Sliding Celtic Button Knot |
||||
|
The Sliding Celtic Button is
tied the same way as the standard button. The
difference is that there is a holding
cord running through it. This allows the knot to be positioned where you need it, since it slides along the holding cord. Step1: To practice this variation of the Celtic Button knot, you need 2 cords. The working cord should be at least 36 inches long. In the images, that's the pink cord. The holding cord is brown. Secure the holding cord horizontally, with tension. Secure the other cord at the left end, also resting horizontally. It should rest below the holding cord. |
||||
 |
Make the first loop with the working end,
rotating counter-clockwise.
As you do this, make sure you pass the end under the holding cord, and then over, to form the loop. |
|||
 |
Step 2: Rotate counter-clockwise
to make loop 2, passing the end under
the holding cord first. Place it to the right of the first loop, resting on top. You need to have three obvious spaces. |
|||
 |
Step 3: Start the third loop
by passing the working end under
the holding cord. Weave the working end through the four segments over - under - over - under. Arrange the loops so you can still see the central space clearly (X). |
|||
 |
Step 5: Start the fourth loop
by first passing under the
holding cord. Move the working end over the segment of loop 3 on the right, under the next two segments, and out through the central space. |
|||
|
Tighten the Sliding Celtic Button Knot
gradually, removing the slack from the loops,
starting with the second one. Remember that each
loop you pull on will tighten the one before
it. The last step is to pull on the end. |
||||
|
||||
الفن المكرامي الدرس112 شرح بالصورعقدةJosephine Knot |
|||
 |
|||
| Description:
The Josephine Knot originated in the
Orient, where it is still called the Double
Coin Knot. In European countries it was named for Empress Josephine, who was the wife of Napolean for a time. There are two variations on this page. The first set of instructions show you how to tie this decorative knot in the center of a cord, with two ends free to move after the knot is tied. The second set of instructions will show you how to tie this Macrame knot with only one free end. You will find the method useful when tying it in a series, or combined with other knots. A third variation is on a separate page and is called the Sailors Knot. It's made with two cords and has only two loops. To view two jewelry projects where this knot was used, click on these links:
|
|||
|
|||
|
|||
|
|||
| Step 4: Tighten
loop
2 first, by pulling on loops 1 and
3. Remove the slack in loops 1 and 3 by pulling on the ends. |
|||
|
|
|||
 |
|||
| Second
Variation |
|||
| In the previous
instructions, you rotated the left half of the
cord to make the first loop, which was at the
center. Then you used the right half for the
rest of the knot. When other knots are present, you need to be able to make the Josephine knot with only one end free to move. |
|||
|
|||
|
|||
|
|||
|
|||
صفحتنا على الفيس بوك
ماكرامي،
مكرامي ،تعلم ، مكرامي ، خياطة ،أشغال يدوية ،فن مكرامي،صندوق ابيض،عروس
،زوج ، حمل ،طبخ ،حلويات ،أشغال يدوية ، للعرائس،قنادر ،خياطة ، ،شرح
،mkrami2014ماكرامي، مكرامي ،تعلم ، مكرامي ، خياطة ،أشغال يدوية ،فن مكرامي ،شرح ،mkrami2014
عمل علبة للاكسسوارات ,طريقة عمل علبه للاكسسوارات انيقه ,طريقة عمل قفص
للاكسسوارات جميل وانيق , عمل علبة اكسسوارات غير مكلفه ,عمل قفص
للاكسسوارات بالصور,طريقة عمل علبة اكسسوارات بالصور ,شرح طريقة عمل علبه
للاكسسوارات بالصور ,اسهل طريقه لعمل علبة اكسسوارات ,طريقة عمل علب
الاكسسوارات ,طريقه عمل قفص للاكسسوارات بالصور ,اعمال فنية.اشغال يدوية
بالعجائن.عجينة الملح والسيراميك.اعمال فنية.اعمال بالورق،طريقه عمل خداديه
كلها ورد من نفس القماش , طريقه عمل خداديه كلها ورد من نفس القماش ,
طريقه عمل خداديه كلها ورد من نفس القماش , طريقه عمل خداديه كلها ورد من
نفس القماش , طريقه عمل خداديه كلها ورد من نفس القماش اضغط هنا وأنشر
الموضوع على صفحتك، تسريح الشعر ، عروسة ، رمضان 2014، مكرامي 2014 ،
lmvhld 2014Klhmvhld 2014Kماكرامي، المركامياعمال فنية.اشغال يدوية
بالعجائن.عجينة الملح والسيراميك.اعمال فنية.اعمال بالورق،طريقه عمل خداديه
كلها ورد من نفس القماش , طريقه عمل خداديه كلها ورد من نفس القماش ,
طريقه عمل خداديه كلها ورد من نفس القماش , طريقه عمل خداديه كلها ورد من
نفس القماش , طريقه عمل خداديه كلها ورد من نفس القماش اضغط هنا وأنشر
الموضوع على صفحتك، تسريح الشعر ، عروسة ، رمضان 2014، مكرامي 2014 ،
lmvhld 2014Klhmvhld 2014Kماكرامي، المركامي
|